0%

逆向学习 0x07免root使用frida

frida.exe的详细使用

有一坨,好多都不怎么用,先整点经常用的

选项 介绍
-U, –usb 连接USB设备,这个时候是不需要端口转发的,直接连上
-R, –remote 连接远程设备
-H HOST, –host HOST 连接网络设备,连接指定IP地址和端口的frida-server
-f TARGET, –file TARGET 后面跟包名,启动软件,启动时开始hook
-F, –attach-frontmost 注入正在打开的最前端的进程
-n NAME, –attach-name NAME 也是加包名,但是 -n 可以省略
-p PID, –attach-pid PID 根据进程的PID注入; ps -A 打印进程; -p 也是可以省略的
-l SCRIPT, –load SCRIPT 脚本代码的路径
-o LOGFILE, –output LOGFILE 指定内容输出位置
–runtime {qjs,v8} 指定解析脚本的引擎

-p 一般是遇到软件双进程时使用,app有两个进程,包名还是一样的,就需要指定PID

1
2
3
4
5
6
7
8
9
10
11
12
13
14
15
16
17
18
19
20
21
22
23
24
25
26
27
28
29
30
31
32
33
34
35
36
37
38
39
40
41
42
43
44
45
46
47
48
49
50
51
52
53
54
55
56
57
58
59
60
61
62
63
options:
-h, --help show this help message and exit
-D ID, --device ID connect to device with the given ID
-U, --usb connect to USB device
-R, --remote connect to remote frida-server
-H HOST, --host HOST connect to remote frida-server on HOST
--certificate CERTIFICATE
speak TLS with HOST, expecting CERTIFICATE
--origin ORIGIN connect to remote server with “Origin” header set to ORIGIN
--token TOKEN authenticate with HOST using TOKEN
--keepalive-interval INTERVAL
set keepalive interval in seconds, or 0 to disable (defaults to -1 to auto-select based on transport)
--p2p establish a peer-to-peer connection with target
--stun-server ADDRESS
set STUN server ADDRESS to use with --p2p
--relay address,username,password,turn-{udp,tcp,tls}
add relay to use with --p2p
-f TARGET, --file TARGET
spawn FILE
-F, --attach-frontmost
attach to frontmost application
-n NAME, --attach-name NAME
attach to NAME
-N IDENTIFIER, --attach-identifier IDENTIFIER
attach to IDENTIFIER
-p PID, --attach-pid PID
attach to PID
-W PATTERN, --await PATTERN
await spawn matching PATTERN
--stdio {inherit,pipe}
stdio behavior when spawning (defaults to “inherit”)
--aux option set aux option when spawning, such as “uid=(int)42” (supported types are: string, bool, int)
--realm {native,emulated}
realm to attach in
--runtime {qjs,v8} script runtime to use
--debug enable the Node.js compatible script debugger
--squelch-crash if enabled, will not dump crash report to console
-O FILE, --options-file FILE
text file containing additional command line options
--version show program's version number and exit
-l SCRIPT, --load SCRIPT
load SCRIPT
-P PARAMETERS_JSON, --parameters PARAMETERS_JSON
parameters as JSON, same as Gadget
-C USER_CMODULE, --cmodule USER_CMODULE
load CMODULE
--toolchain {any,internal,external}
CModule toolchain to use when compiling from source code
-c CODESHARE_URI, --codeshare CODESHARE_URI
load CODESHARE_URI
-e CODE, --eval CODE evaluate CODE
-q quiet mode (no prompt) and quit after -l and -e
-t TIMEOUT, --timeout TIMEOUT
seconds to wait before terminating in quiet mode
--pause leave main thread paused after spawning program
-o LOGFILE, --output LOGFILE
output to log file
--eternalize eternalize the script before exit
--exit-on-error exit with code 1 after encountering any exception in the SCRIPT
--kill-on-exit kill the spawned program when Frida exits
--auto-perform wrap entered code with Java.perform
--auto-reload Enable auto reload of provided scripts and c module (on by default, will be required in the future)
--no-auto-reload Disable auto reload of provided scripts and c module

frida-server选项

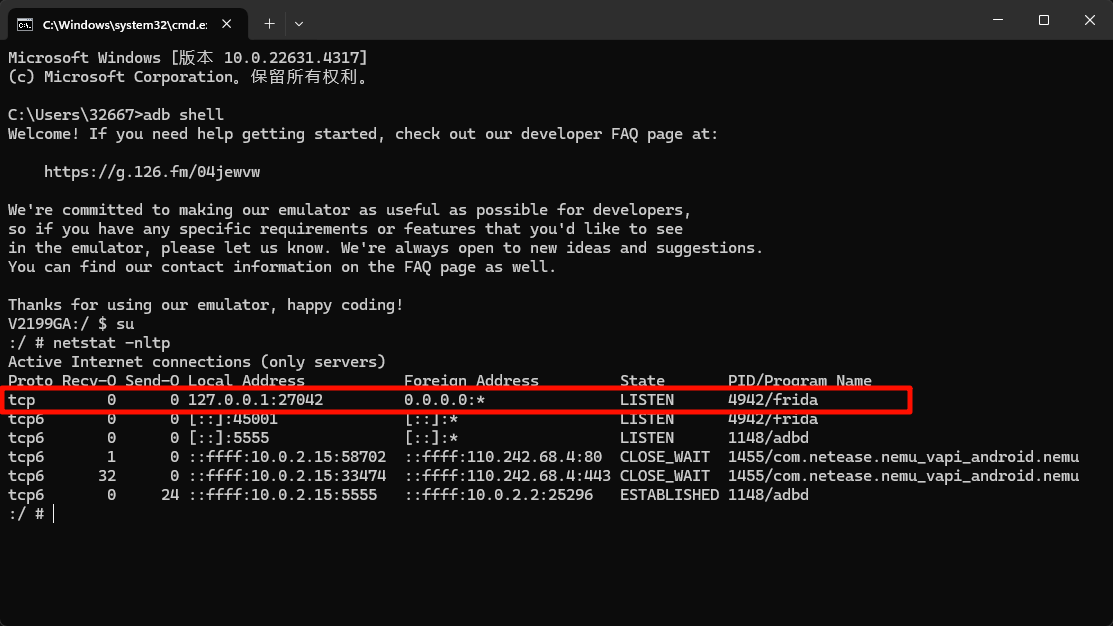
之前启动frida-server服务都是直接

1
2
3
adb shell
su
./data/local/tmp/frida

这样的话是默认启动的 27042 端口

image-20241023114130141

有时候会出现这个端口被APP提前占用的情况,这个时候就需要指定端口了

1
2
3
4
5
6
7
8
9
10
11
12
13
14
15
16
Help Options:
-h, --help Show help options

Application Options:
--version Output version information and exit
-l, --listen=ADDRESS Listen on ADDRESS
--certificate=CERTIFICATE Enable TLS using CERTIFICATE
--origin=ORIGIN Only accept requests with ?Origin? header matching ORIGIN (by default any origin will be accepted)
--token=TOKEN Require authentication using TOKEN
--asset-root=ROOT Serve static files inside ROOT (by default no files are served)
-d, --directory=DIRECTORY Store binaries in DIRECTORY
-D, --daemonize Detach and become a daemon
--policy-softener=system|internal Select policy softener
-P, --disable-preload Disable preload optimization
-C, --ignore-crashes Disable native crash reporter integration
-v, --verbose Be verbose
选项 介绍
-l, –listen=ADDRESS 修改监听的IP和端口

使用 ip address 查看当前IP地址

image-20241023114737298

这里我的frida-server 的名字就是frida,所以输入Frida

1
frida -l 0.0.0.0:8000

这个时候启动的frida-server就是8000端口的

frida连接多个设备

传统简单的连接方式 -U ,但是电脑不能插满USB吧,所以要想连接多个设备,就需要 -H 的帮助,并且frida-server要指定好端口,确保手机和电脑之间可以通信(能ping通)

1
frida -H IP:端口 -F

脱离PC使用frida

之前使用的 frida-server 是使用PC用于调试阶段的,如果要进行破解什么的操作,还是要脱离PC端

1
2
3
4
5
1、在手机上使用 Termux 终端,这个就相当于在手机上安装一个命令行
2、frida-inject
3、frida-gadget.so
优点:可以免root使用frida、frida-gadget比较稳定
缺点:需要重打包app,局限性较大。但是可以通过魔改安卓系统,让系统帮我们注入so,免去重打包的繁琐

frida-inject

和frida-server安装方法一样,使用之前要先去下载对应frida版本的东西,然后和frida-server一样推送到手机中。

frida-inject可以做到持续hook,实现脱离PC

看一下帮助

1
2
3
4
5
6
7
8
9
10
11
12
13
14
15
16
17
18
19
Usage:
frida-inject [OPTION?]

Help Options:
-h, --help Show help options

Application Options:
-D, --device=ID connect to device with the given ID
-f, --file=FILE spawn FILE
-p, --pid=PID attach to PID
-n, --name=NAME attach to NAME
-r, --realm=REALM attach in REALM
-s, --script=JAVASCRIPT_FILENAME
-R, --runtime=qjs|v8 Script runtime to use
-P, --parameters=PARAMETERS_JSON Parameters as JSON, same as Gadget
-e, --eternalize Eternalize script and exit
-i, --interactive Interact with script through stdin
--development Enable development mode
--version Output version information and exit

值得一说的是 -e 永久化脚本,将脚本文件放到手机文件中,然后运行执行frida命令,就可以关闭命令行来实现hook了,但是这种方法也是有缺陷的,手机重启还得重新进行执行命令

如果说不使用 -e 选项,frida-inject 也是不能离开电脑的

frida-gadget.so

这个服务是免root的,也就是用户用起来最舒服的一种方式,但是开发者不舒服[doge]

我们需要将这个so放到app中去,这个时候需要反编译app,并且不需要root权限,将so打包进app省略了之前注入时需要的root权限

先使用 apktool 进行解包,然后将 so 放到对应的目录下,然后修改代码加载这个so,然会回编译,最后进行签名

使用过程比较繁琐,但是objection中有简单的方法

objection

下崽安装使用

objection对frida进行了进一步的封装,通过一系列的命令即可完成hook。大大降低了hook的门槛

安装objection之前需要安装frida和frida-tools

为了兼容性更好,安装的objection的版本最好在当前frida版本之后更新,然后发现。测,21年就停更了牢弟,那我还下鸡毛啊

1
pip install objection

直接下崽就完事了

命令行输入,检测是否下载完成

1
objection
1
2
3
4
5
6
7
8
9
10
11
12
13
14
15
16
17
18
19
20
21
22
23
24
25
26
27
28
29
30
31
32
33
34
35
36
Usage: objection [OPTIONS] COMMAND [ARGS]...

_ _ _ _
___| |_|_|___ ___| |_|_|___ ___
| . | . | | -_| _| _| | . | |
|___|___| |___|___|_| |_|___|_|_|
|___|(object)inject(ion)

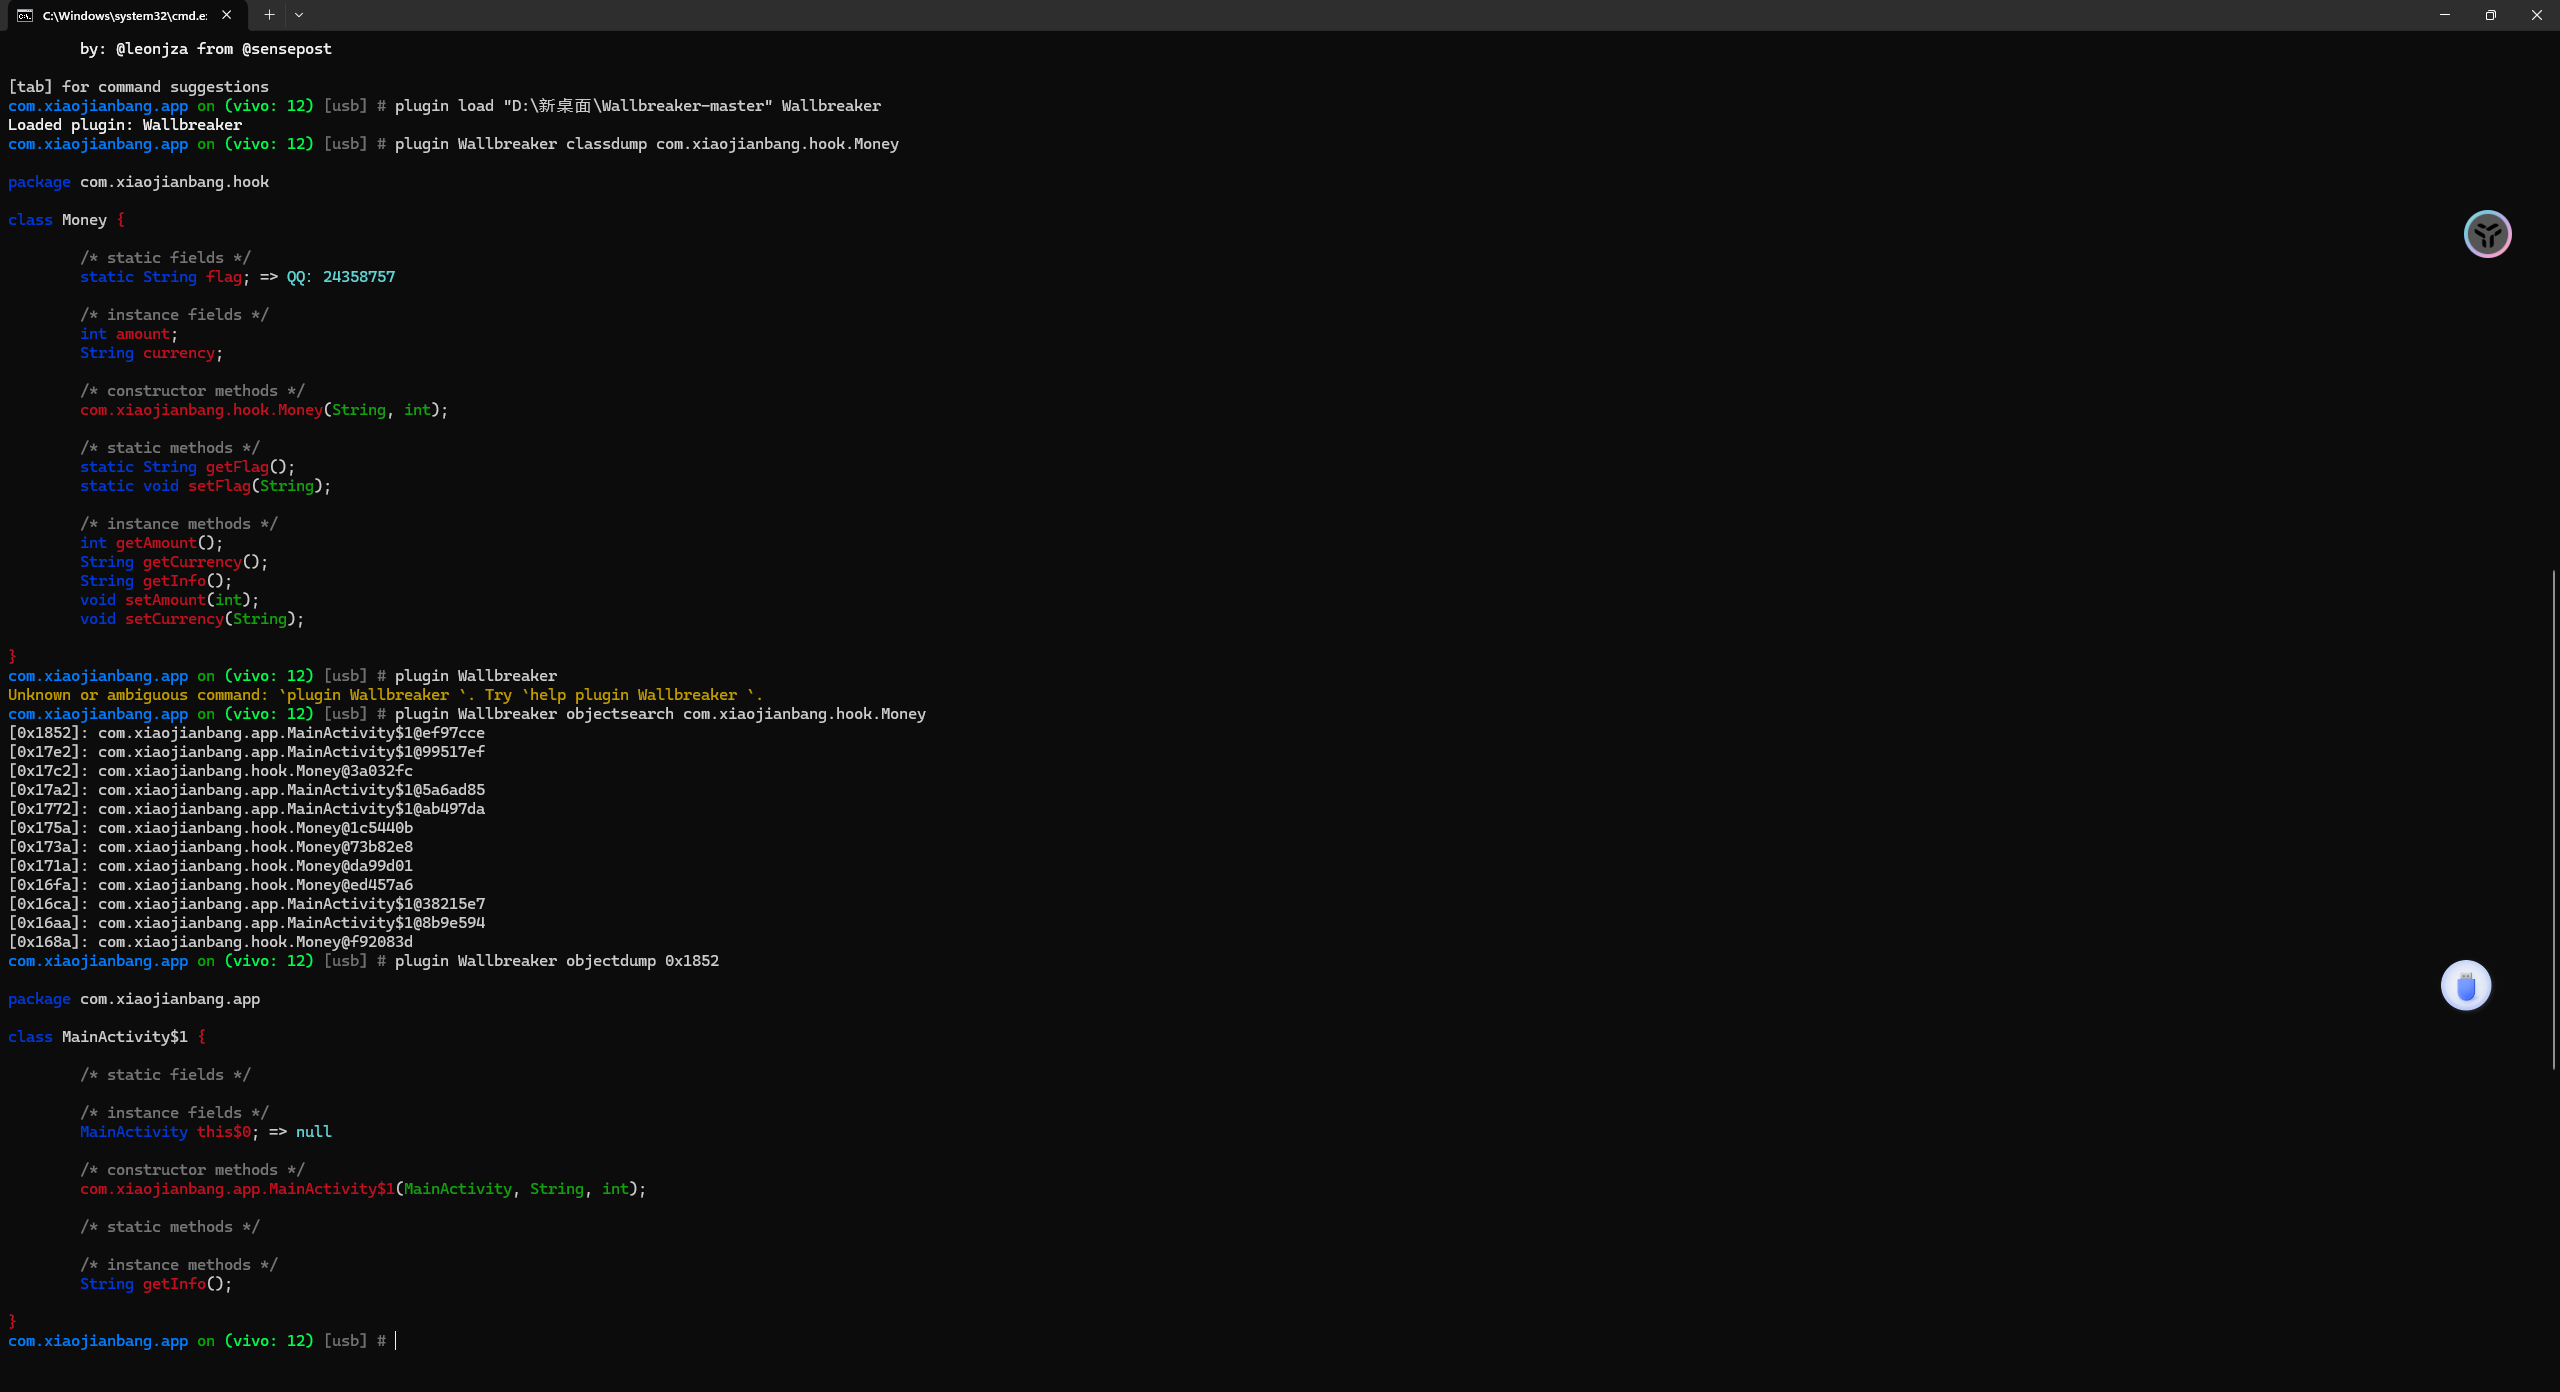
Runtime Mobile Exploration
by: @leonjza from @sensepost

By default, communications will happen over USB, unless the --network option
is provided.

Options:
-N, --network Connect using a network connection instead of USB.
-h, --host TEXT [default: 127.0.0.1]
-p, --port INTEGER [default: 27042]
-ah, --api-host TEXT [default: 127.0.0.1]
-ap, --api-port INTEGER [default: 8888]
-g, --gadget TEXT Name of the Frida Gadget/Process to connect to.
[default: Gadget]
-S, --serial TEXT A device serial to connect to.
-d, --debug Enable debug mode with verbose output. (Includes
agent source map in stack traces)
--help Show this message and exit.

Commands:
api Start the objection API server in headless mode.
device-type Get information about an attached device.
explore Start the objection exploration REPL.
patchapk Patch an APK with the frida-gadget.so.
patchipa Patch an IPA with the FridaGadget dylib.
run Run a single objection command.
signapk Zipalign and sign an APK with the objection key.
version Prints the current version and exists.
1
2
3
4
5
6
7
-N: 表示网络连接,不加表示USB连接
-h: 主机名,默认是 127.0.0.1
-p: 端口,默认是 27042
-g: 指定进程名\包名

explore:启动objection交互界面,explore也有选项,下面再说
patchapk

启动

1
objection -g 包名 explore

objection使用的是frida-server,所以要开启frida-server

可以提示代码,按右箭头选中

之前打印所有加载的类也只需要一行代码(JS中好像也是一行

然后运行的结果会保存在 C盘中用户目录下的 .objection 目录中

PS:感觉不是很好啊,聊胜于无吧

常用方法

既然是一行代码可以解决问题,那就看看可以干什么吧。毕竟被称为——有手就行的hook

1
2
3
4
5
6
7
8
9
10
11
12
13
14
15
16
17
18
19
20
21
22
23
列出所有已加载的类(常用)
android hooking list classes

在所有已加载的类中搜索包含特定关键字的类(常用)
android hooking search classes <pattern>

列出类的所有方法(常用)
android hooking list class_methods <路径.类名>

hook类的所有方法(不包括构造方法)
android hooking watch class <路径.类名>

hook类的构造方法
android hooking watch class_method <路径.类名.$init>

默认是hook方法的所有重载(常用)
android hooking watch class_method <路径.类名.方法名>

hook方法的参数、返回值和调用栈(常用)
android hooking watch class_method <路径.类名.方法名> --dump-args --dump-return --dump-backtrace

hook单个重载函数,需要指定参数类型,多个参数需要用逗号分隔
android hooking watch class_method <路径.类名.方法名> "<参数类型>"

收回我愚昧的话,还挺方便,那就先把他的log输出路径改一下吧,不要在我神圣不可侵犯的C盘,乱写乱画。

更改log路径

爆搜一下文佳路径中包含的文件夹,文件也不是很多,打开第一个

image-20241023210239420

没想到直接中奖了

直接给这玩意改个喜欢的路径试试效果

image-20241023210514569

运行一下试试水

image-20241023210609691

很显然,主要的问题解决了,但是还有剩余,因为还有两个文件

image-20241023210841965

在这三个文件中找到了,三个文件的地址,都改为自己喜欢的地址即可

image-20241023211125050

还有一个意外之喜,在base.py中还有一个文件路径,虽然没看见这个文件,但是牢弟改就完了

image-20241023211223906

非常好,已经从C盘消失了,我很满意

其他常见操作

1
2
3
4
5
6
7
8
9
10
11
12
13
14
查看hook了多少类
jobs list

取消hook
jobs kill <jobld>

指定IP和端口连接
objection -N -h <ip> -p <port> -g <进程名> explore

启动前就hook
objection -N -h <ip> -p <port> -g <进程名> explore --startup-command "android hooking watch class <路径.类名>"

启动前就hook打印参数、返回值、函数调用栈
objection -N -h <ip> -p <port> -g <进程名> explore --startup-command "android hooking watch class <路径.类名.方法名> --dump-args --dump-return --dump-backtrace"

看一下explore有啥小功能

1
2
3
4
5
6
7
8
9
10
11
12
13
14
15
16
Usage: objection explore [OPTIONS]

Start the objection exploration REPL.

Options:
-s, --startup-command TEXT A command to run before the repl polls the
device for information.
-q, --quiet Do not display the objection logo on startup.
-c, --file-commands FILENAME A file containing objection commands,
separated by a newline, that will run before
the repl polls the device for information.
-S, --startup-script FILENAME A script to import and run before the repl
polls the device for information.
-a, --enable-api Start the objection API server.
-P, --plugin-folder TEXT The folder to load plugins from.
--help Show this message and exit.
1
2
3
4
objection -g <进程名> explore --startup-command "android hooking watch class_method com.xiaojianbang.hook.Utils.shufferMap2 --dump-args --dump-backtrace --dump-return"

-N -h <ip> -p <port> 默认frida-server服务的话是不需要这个的
这就是一句启动前hook的代码
1
2
如果启动前需要hook多个函数,那么就需要 -c 了,将引号内的指令,放到一个文件中去
objection -g <进程名> explore -c "文件路径"

不太常见的操作

1
2
3
4
5
关闭ssl校检
android sslpinning disable

关闭root检测
android root disable

这两个并不能百分百过掉,但是可以先上来测他一下

1
2
3
4
5
6
7
8
9
10
11
12
13
14
15
16
17
搜索堆中的实例
android heap search instances <类名>

查看当前app的activity
android hooking list activities

尝试跳转到对应activiy (或许可以直接跳转到想要的页面也说不定)
android intent launch_activity

枚举内存中所有模块 (枚举SO文件)
memory list modules

枚举模块中所有导出函数
memory list exports <so库名>

当结果太多,可以将结果导出到本地文件中
memory list exports <so库名> --json <路径.文件名>

整个小插件

1
2
3
4
5
6
7
8
9
10
11
12
13
14
插件加载
plugin load 插件路径 Wallbreaker

搜索类
plugin Wallbreaker classsearch <pattern>

搜索对象
plugin Wallbreaker objectsearch <classname>

classdump输出类结构,若加了 --fullname 参数,打印数据中的类名会带完整包名
plugin Wallbreaker classdump <classname> [--fullname]

objectdump在classdump的基础上,输出指定对象中的每个字段的数据
plugin Wallbreaker objectdump <handle> [--fullname]

objection起起来之后先进行插件加载操作,然后输出类结构,去搜索这个类的对象,根据对象的地址值来打印字段数据

image-20241024111346319

frida-gadget.so

干点正事吧,巴巴托斯。简单使用这个需要使用到 objection 的 patchapk 选项,这个一会再说,先准备一下环境

1
2
3
4
5
6
7
8
9
10
11
12
13
14
15
16
17
18
19
20
21
22
23
24
25
26
27
28
29
30
31
32
33
34
35
36
37
Usage: objection patchapk [OPTIONS]

Patch an APK with the frida-gadget.so.

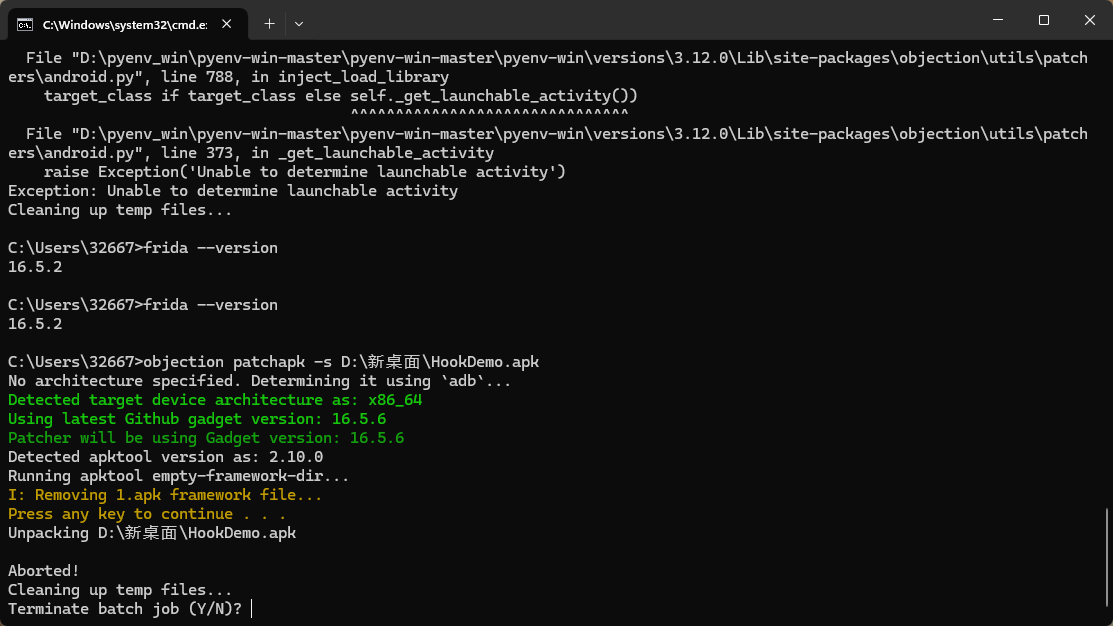
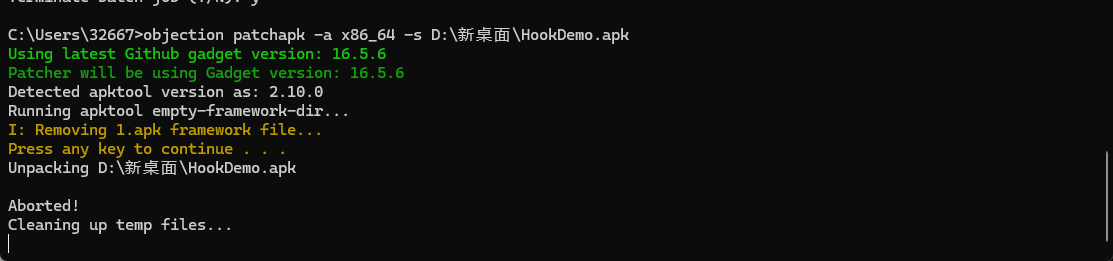
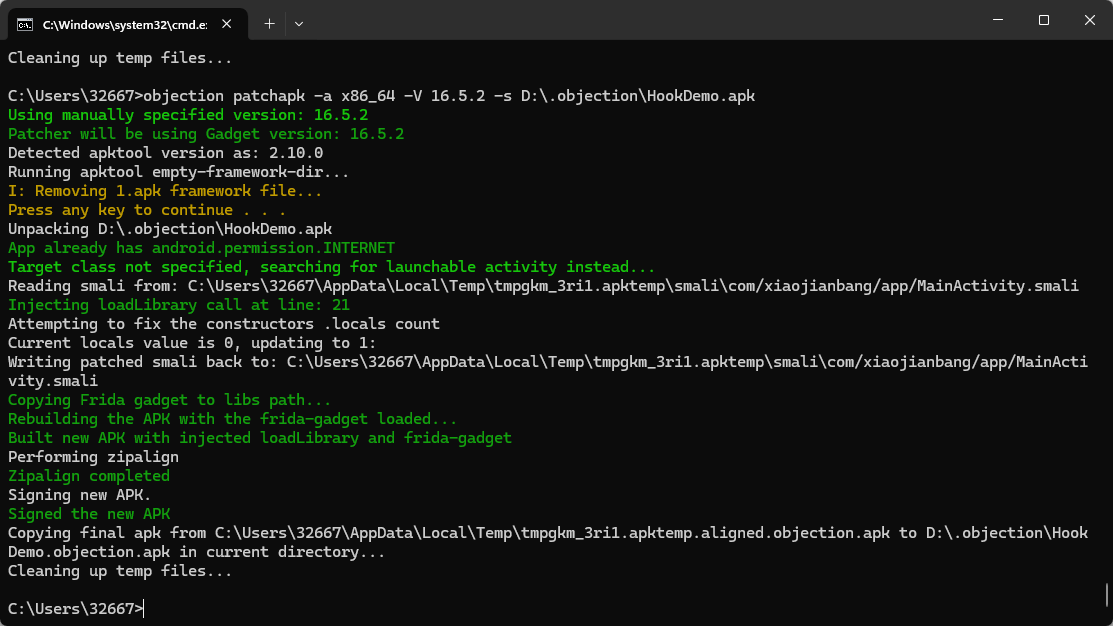
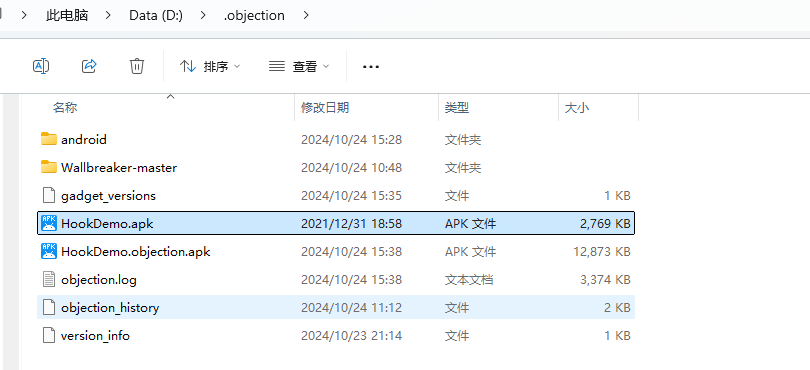
Options:
-s, --source TEXT The source APK to patch [required]
-a, --architecture TEXT The architecture of the device the patched
APK will run on. This can be determined with
`adb shell getprop ro.product.cpu.abi`. If it
is not specified, this command will try and
determine it automatically.
-V, --gadget-version TEXT The gadget version to use. If not specified,
the latest version will be used.
-p, --pause Pause the patcher before rebuilding the APK.
-k, --skip-cleanup Do not clean temporary files once finished.
-d, --enable-debug Set the android:debuggable flag to true in
the application manifest.
-N, --network-security-config Include a network_security_config.xml file
allowing for user added CA's to be trusted on
Android 7 and up. This option can not be used
with the --skip-resources flag.
-D, --skip-resources Skip resource decoding as part of the apktool
processing.
-t, --target-class TEXT The target class to patch.
-2, --use-aapt2 Use the aapt2 binary instead of aapt as part
of the apktool processing.
-c, --gadget-config TEXT The gadget configuration file to use. Refer
to https://frida.re/docs/gadget/ for more
information.
-l, --script-source TEXT A script file to use with the the "path"
config type. Specify "libfrida-
gadget.script.so" as the "path" in your
config.
-n, --ignore-nativelibs Do not change the extractNativeLibs flag in
the AndroidManifest.xml.
-m, --manifest TEXT A decoded AndroidManifest.xml file to read.
--help Show this message and exit.
环境准备

aapt

去build-tools中找到这个,确保可以随时使用,可以配置一下环境变量

很显然这个东西是用来做打包apk的

image-20241024120148085

image-20241024120232932

jarsigner

一般jadx中就有,如果jadx可以正常使用,命令行输入 jarsigner 也没什么问题

这个是用来签名的,app反编译回编译之后是需要签名的,否则无法在安卓系统中使用

image-20241024120308115

apktool

https://apktool.org/docs/install/

先下载jar文件,然后找到将网页中 bat 信息复制到自己新建的 apktool.bat 文件中

image-20241024142159935

配置环境变量,输入apktool出现如下结果

image-20241024142101973

adb

这个之前弄过了,还弄个鸡毛呀,pass

使用介绍
1
-s: 指定apk的路径

image-20241024145841820

1
-a: 指定手机的平台,如果不指定的话自动运行 adb shell getprop ro.product.cup.abi 获取,之所以准备adb也是因为这个

如果指定了 -a 就不会执行这句了

image-20241024150006322

这里插入一个so平台选择吧

可以执行adb代码查看,我用的模拟器,所以是 x86_64,如果是真机的话就是arm

1
adb shell getprop ro.product.cup.abi

Android系统是32位,那么app里的so都走32位的

Android系统是64位,如果app里面有64位的so,那么app就走64位的so

Android系统是64位,如果app里面只有32位的so,那么app就走32位的so

所以说还需要注意apk的so的情况,如果手机是64位的,但是apk中没有64位的so文件,那么就必须用 -a 指定32位的下载,否则执行文件里就一个 gadget.so app还执行个P啊还

还有一个bug,就是是会从gitup上下载最新版本的 frida-gadget.so 不仅和frida版本不匹配还得下载东西,气抖冷

快对他使用 -V

1
-V: 指定gadget版本
1
-p: 在回编译的时候停止,这个一般是不用的,因为停止之后需要手动的回编译和签名

这个东西下的慢,很不体面,帮他体面体面

image-20241024153201315

去这个目录下,把下载好的 gadget.so 解压放里面,重命名为 libfrida-gadget.so ,没体面成功,但是他体面了,但是这个方法应该是可行的。

还有一个问题,我犯忌讳了,目录不能有中文路径,得给apk路径改一下

image-20241024154243457

运行成功,目录里多了一个apk文件

而且改的那个文件路径也是有备无患了,果然用到了

image-20241024154301562

这个时候apk已经打包完成了,现在不需要开启frida-server了,也就是说不需要root就可以hook了

过程介绍

稀里糊涂的就给他注入了,看一下注入过程

第一步:反编译,将so注入对应平台的cup的so文件夹

image-20241024155714111

第二布:加载so

找到入口类:第一个带有 LAUNCHER 的 activity 的类或者 application 上的 android:name

image-20241024160112663

在这个类中可以看到一个静态代码块,直接就加载了so

image-20241024160350035

第三步:回编译为apk,更改签名信息

光看名字就能看出来,签名信息是不一样的,变为了OBJECTION的签名信息

image-20241024160720713

优缺点

优点很明显就是免root,如果遇到绕不过的root检测,或者手机无法获取root,这个无疑是一个很好的方法

缺点也很突出:

1
2
1、有些app反编译和回编译可能会出错
2、有些app存在签名校检、文件校检

签名校验

包露馅的牢弟,签名信息是包改不可的,因为文件变了,哈希也就变了,签名信息对不上是不能安装的。

就得见招拆招,过签名检测,还可能有文件校验,你就使劲过吧,牢弟

改进方法就是魔改安卓系统,启动app时,自动开启 gadget.so

使用gadget实现脱离PC

https://frida.re/docs/gadget/

gadget的文档

gadget有四种模式:监听、连接、脚本、脚本目录

image-20241024164653802

使用这些模式需要创建一个配置文件 libgadget.config.txt ,而且 objection 便捷处理的时候需要新增一个选项 -c ,用于指定配置文件

使用脚本和脚本目录就可以做到脱离PC,什么都不需要开,跑app就完事了,持久化hook,但是还是要写hook脚本的牢弟。

监听

默认模式是监听

1
2
3
4
5
6
7
8
9
{
"interaction": {
"type": "listen",
"address": "127.0.0.1",
"port": 27042,
"on_port_conflict": "fail",
"on_load": "wait"
}
}

可以修改IP和端口,但是我监听干鸡毛吧,弄得那么麻烦,看看就得了

连接

更是重量级,跳过

image-20241024165106868

脚本

这个就很常用了,不然废那么大劲和frida-server差不多不是很气人

path指定脚本文件,注意路径是手机上的目录

1
2
3
4
5
6
{
"interaction": {
"type": "script",
"path": "/home/oleavr/explore.js"
}
}

脚本目录

这个还是比较少用的,因为很多时候一个文件就能完事

而且目录的配置文件比较麻烦,注意路径是手机上的目录

1
2
3
4
5
6
{
"interaction": {
"type": "script-directory",
"path": "/usr/local/frida/scripts"
}
}

还得整过滤什么的,麻烦

image-20241024171127315