小敲一下
想写一个与之前微信小程序中相似的实时时间更新
1 2 3 4 5 6 7 8 9 10 11 12 13 14 15 16 17 18 19 20 21 22 23 24 25 26 27 28 29 30 31 32 updateDateTime : function ( var date = new Date (); var year = date.getFullYear (); var month = date.getMonth () + 1 ; var day = date.getDate (); var hours = date.getHours (); var minutes = date.getMinutes (); var seconds = date.getSeconds (); var newdate = new Date ().toLocaleString () var formattedDateTime = `${year} -${month.toString().padStart(2 , '0' )} -${day.toString().padStart(2 , '0' )} ${hours.toString().padStart(2 , '0' )} :${minutes.toString().padStart(2 , '0' )} :${seconds.toString().padStart(2 , '0' )} ` ; this .setData ({ currentDateTime : formattedDateTime }); }, onLoad (options ) { this .updateDateTime (); this .timer = setInterval (this .updateDateTime , 1000 ); }, onUnload ( clearInterval (this .timer ); },
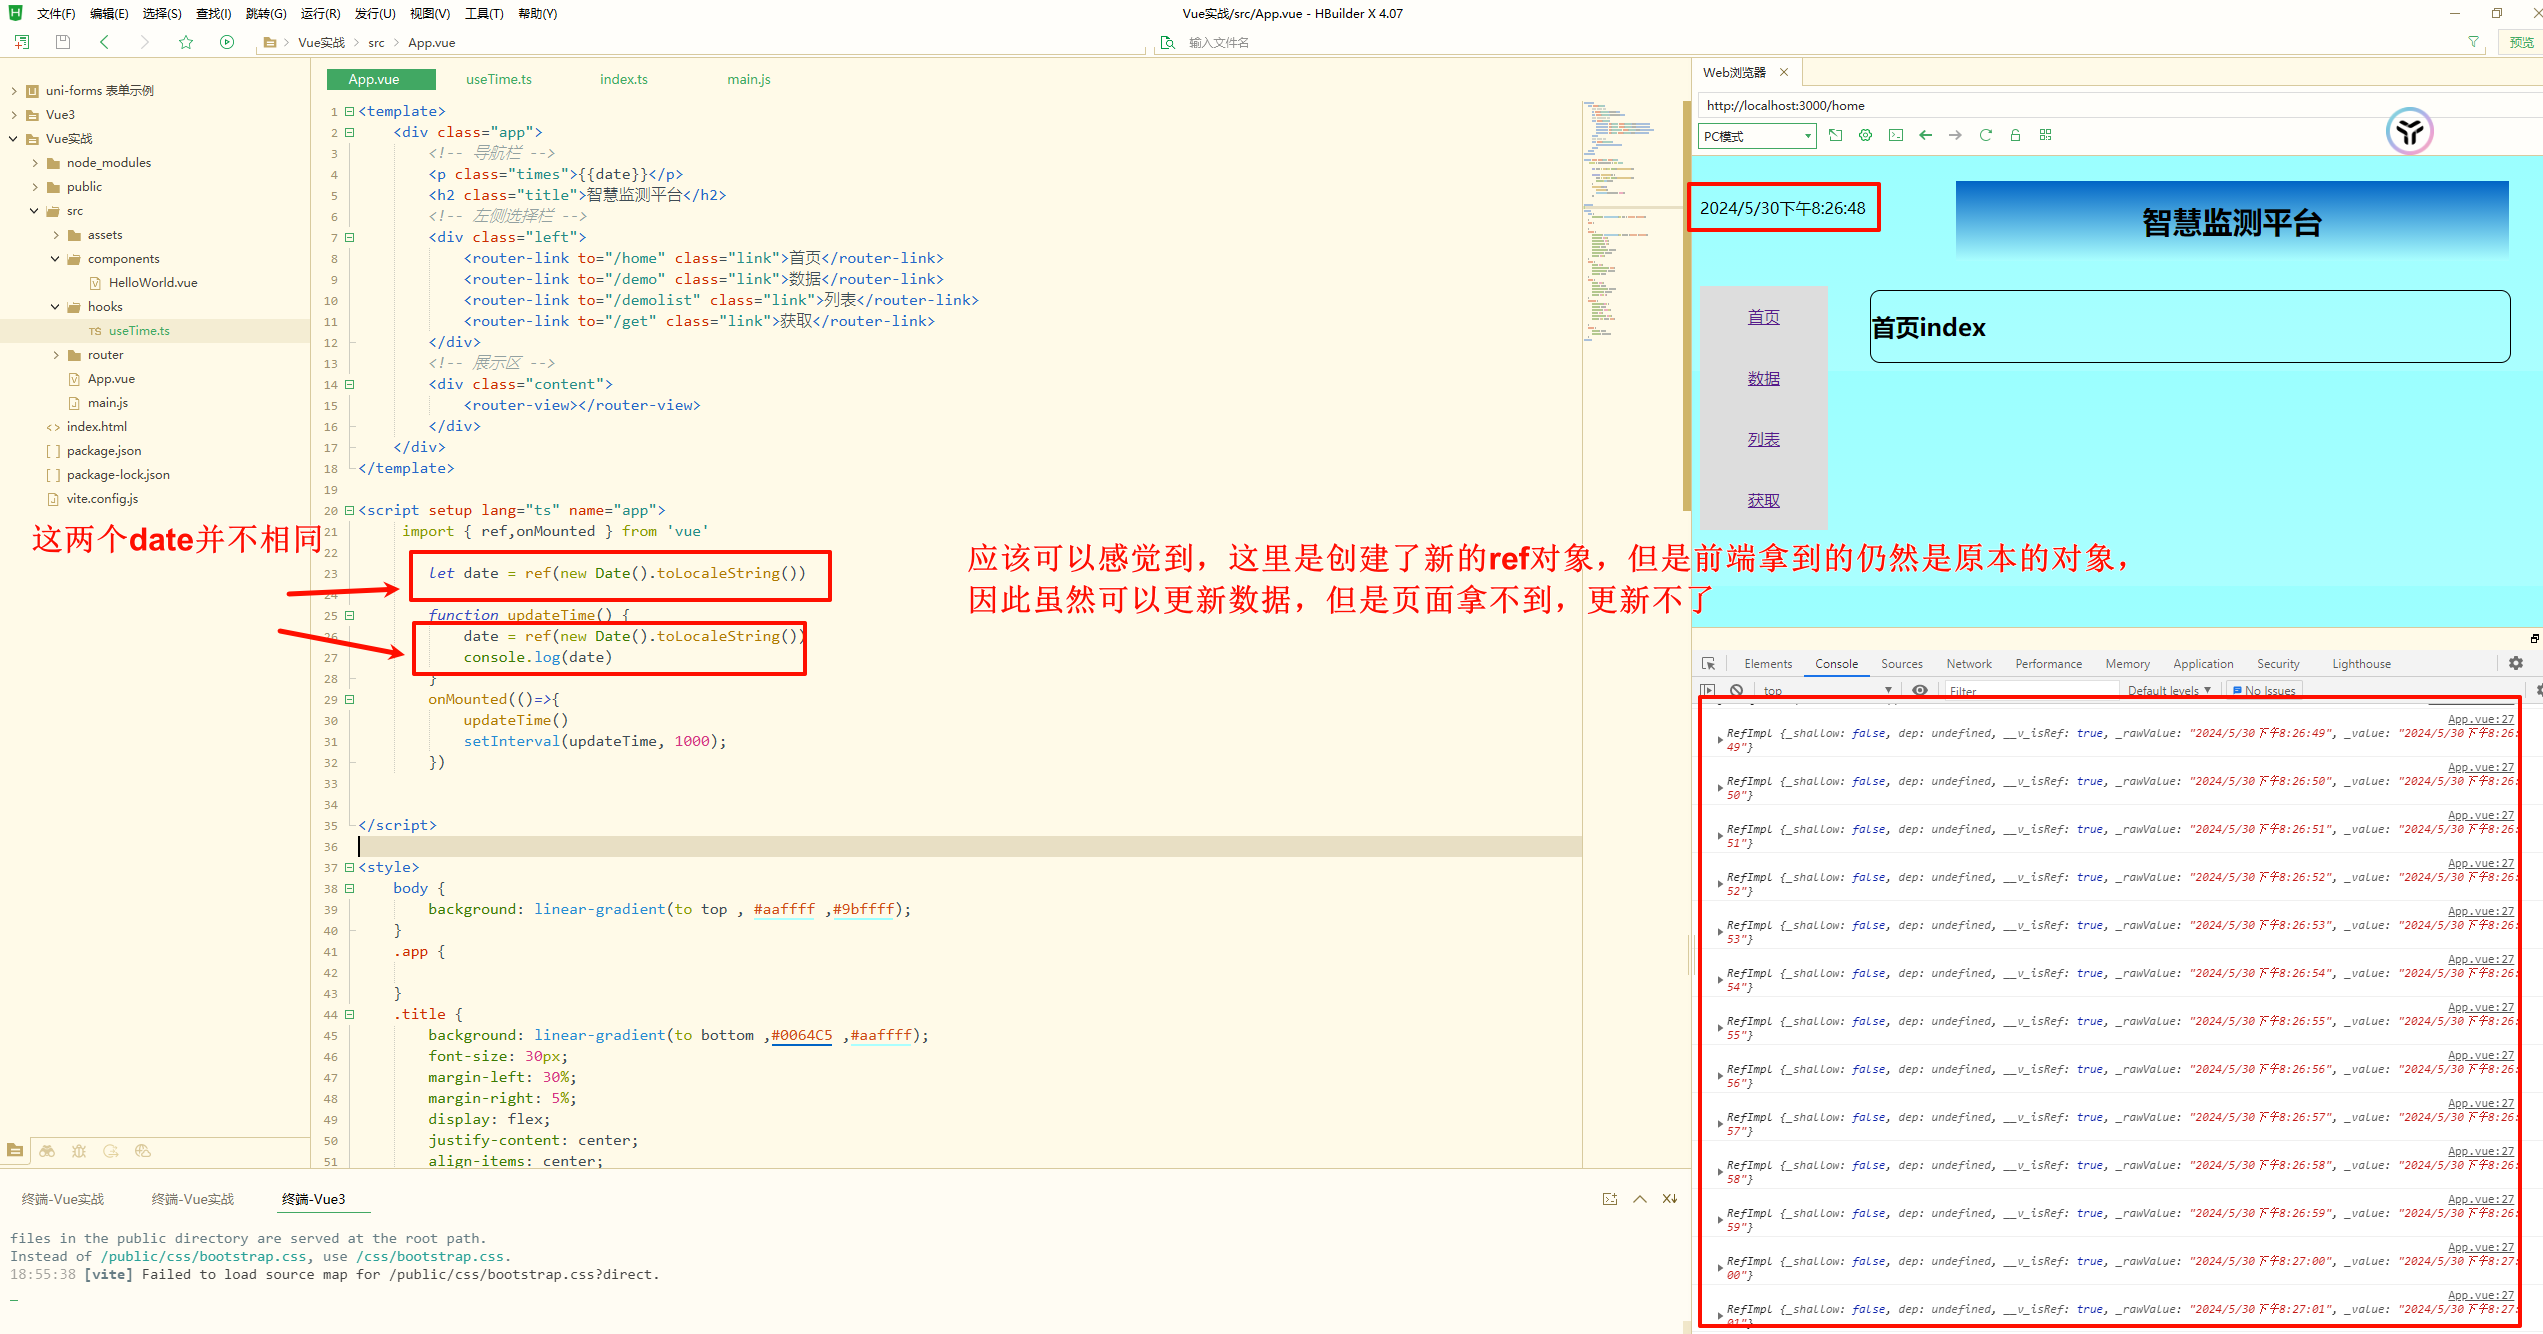
1
2
3
4
5
6
7
8
9
10
11
12
13
14
15
<script setup lang="ts"> //我的想法捏 import { ref,onMounted } from 'vue' let date = ref(new Date().toLocaleString()) function updateTime() { date = ref(new Date().toLocaleString()) } onMounted() { updateTime() setInterval(updateTime, 1000); } // 但是,不刷新数据是不会自动更新的,也就是说setInterval(updateTime, 1000);并没有起作用 </script>
其实,这里有两个问题,第一个onMounted这个钩子的用法不对,这里写的用法是类似于微信小程序中钩子的写法在Vue3中应该为
1
2
3
4
onMounted(()=>{ updateTime() setInterval(updateTime, 1000); })
第二个问题,这里的
需要改为
1 date.value = new Date().toLocaleString()
1
2
3
4
5
6
7
8
9
10
11
12
13
14
15
16
17
18
19
<script setup lang="ts"> //我的想法捏 import { ref,onMounted,onUnmounted } from 'vue' let date = ref(new Date().toLocaleString()) let timer:any function updateTime() { date.value = new Date().toLocaleString() } onMounted() { updateTime() timer = setInterval(updateTime, 1000); } onUnmounted(()=>{ clearInterval(timer) }) // 卸载计时器,因为即使是组件卸载掉了,计时器仍然会继续date依然更新,浪费性能没必要 </script>
但是通过对比发现两者的写法差别是不大的
组件模仿页面切换 但是微信小程序和Vue3 我感觉主要的区别在于,Vue3所有的活动都是在App.vue这个根上的,而微信小程序可以创建很多新的页面,这个时候我准备给Vue3写一个类似于小程序的东西
先搞一个路由
因为只有一个根组件,那么我可以只用路由来达到目的,App.vue中先写一个占位,更换路由占位更换,这就相当于页面更换,这样的话,我感觉就实现了微信小程序页面更换的问题
看一下App.vue
App.vue相当简洁,写了 一个路由占位符,准备渲染组件
1
2
3
4
5
6
7
8
9
10
11
<template> <router-view></router-view> </template> <script setup lang="ts" name="app"> </script> <style> </style>
写一下路由组件
1 2 3 4 5 6 7 8 9 10 11 12 13 14 15 16 17 18 19 20 21 22 23 24 25 26 27 28 29 30 31 32 33 34 35 36 37 38 39 40 41 42 43 44 45 46 47 48 49 import { createRouter, createWebHistory } from "vue-router" ;import Index from "./index.vue" ;import Demo from "./demo.vue" ;import Demolist from "./demolist.vue" ;import Get from "./get.vue" ;import Text from "./text.vue" ;import Mess from "./mess.vue" ;const router = createRouter ({ history : createWebHistory (), routes : [{ path : '/home' , component : Index , children : [ { name : 'demo' , path : 'demo' , component : Demo }, { name : 'demolist' , path : 'demolist' , component : Demolist }, { name : 'get' , path : 'get' , component : Get }, { name :'mess' , path : 'mess' , component : Mess } ] },{ path : '/text' , component : Text },{ path :'/' , redirect :'/home' }] }) export default router
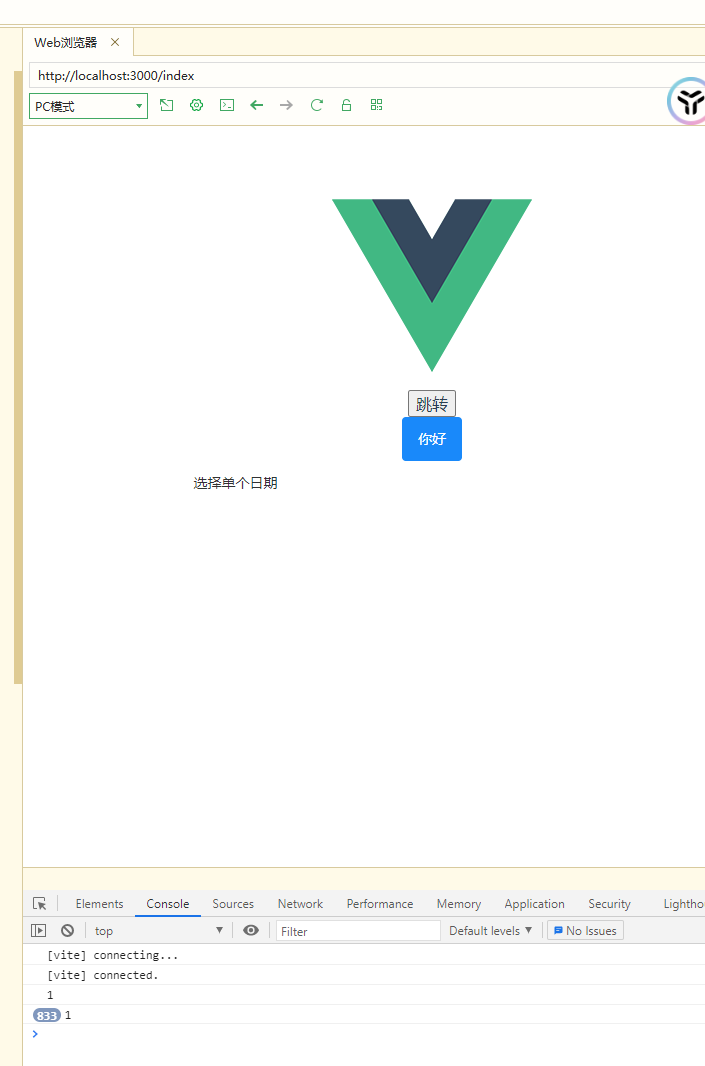
这样呢是形成了两个页面的效果,一个是/home首页,另一个是/text 因为index.vue内是写了一些样式,是一个路由,所以只能算一个页面,而这个text组件,确实是独立的一个页面效果,他是再index组件卸载后,渲染上去的
1
2
3
4
5
6
7
8
9
10
11
12
13
14
15
16
17
18
19
20
21
// text.vue <template> <h2>text</h2> <button @click="showHome()">点我</button> </template> <script setup lang="ts"> import { useRouter } from 'vue-router'; let router = useRouter() function showHome() { router.push({ path:'/' }) } </script> <style> </style>
这样这个效果基本实现,但是是这个跳转方法是不太好复现的,因为无论是history还是hash跳转都是卸载掉当前组件,然后再挂载新的组件的,毕竟一直在那里的只有app.vue,但是还是有点相像的毕竟history可以有浏览器提供的返回键来返回,就相当于wx.navigateTo这种跳转,hash不能由浏览器提供的返回键返回,是属于覆盖性的,就相当于wx.redirectTo跳转了
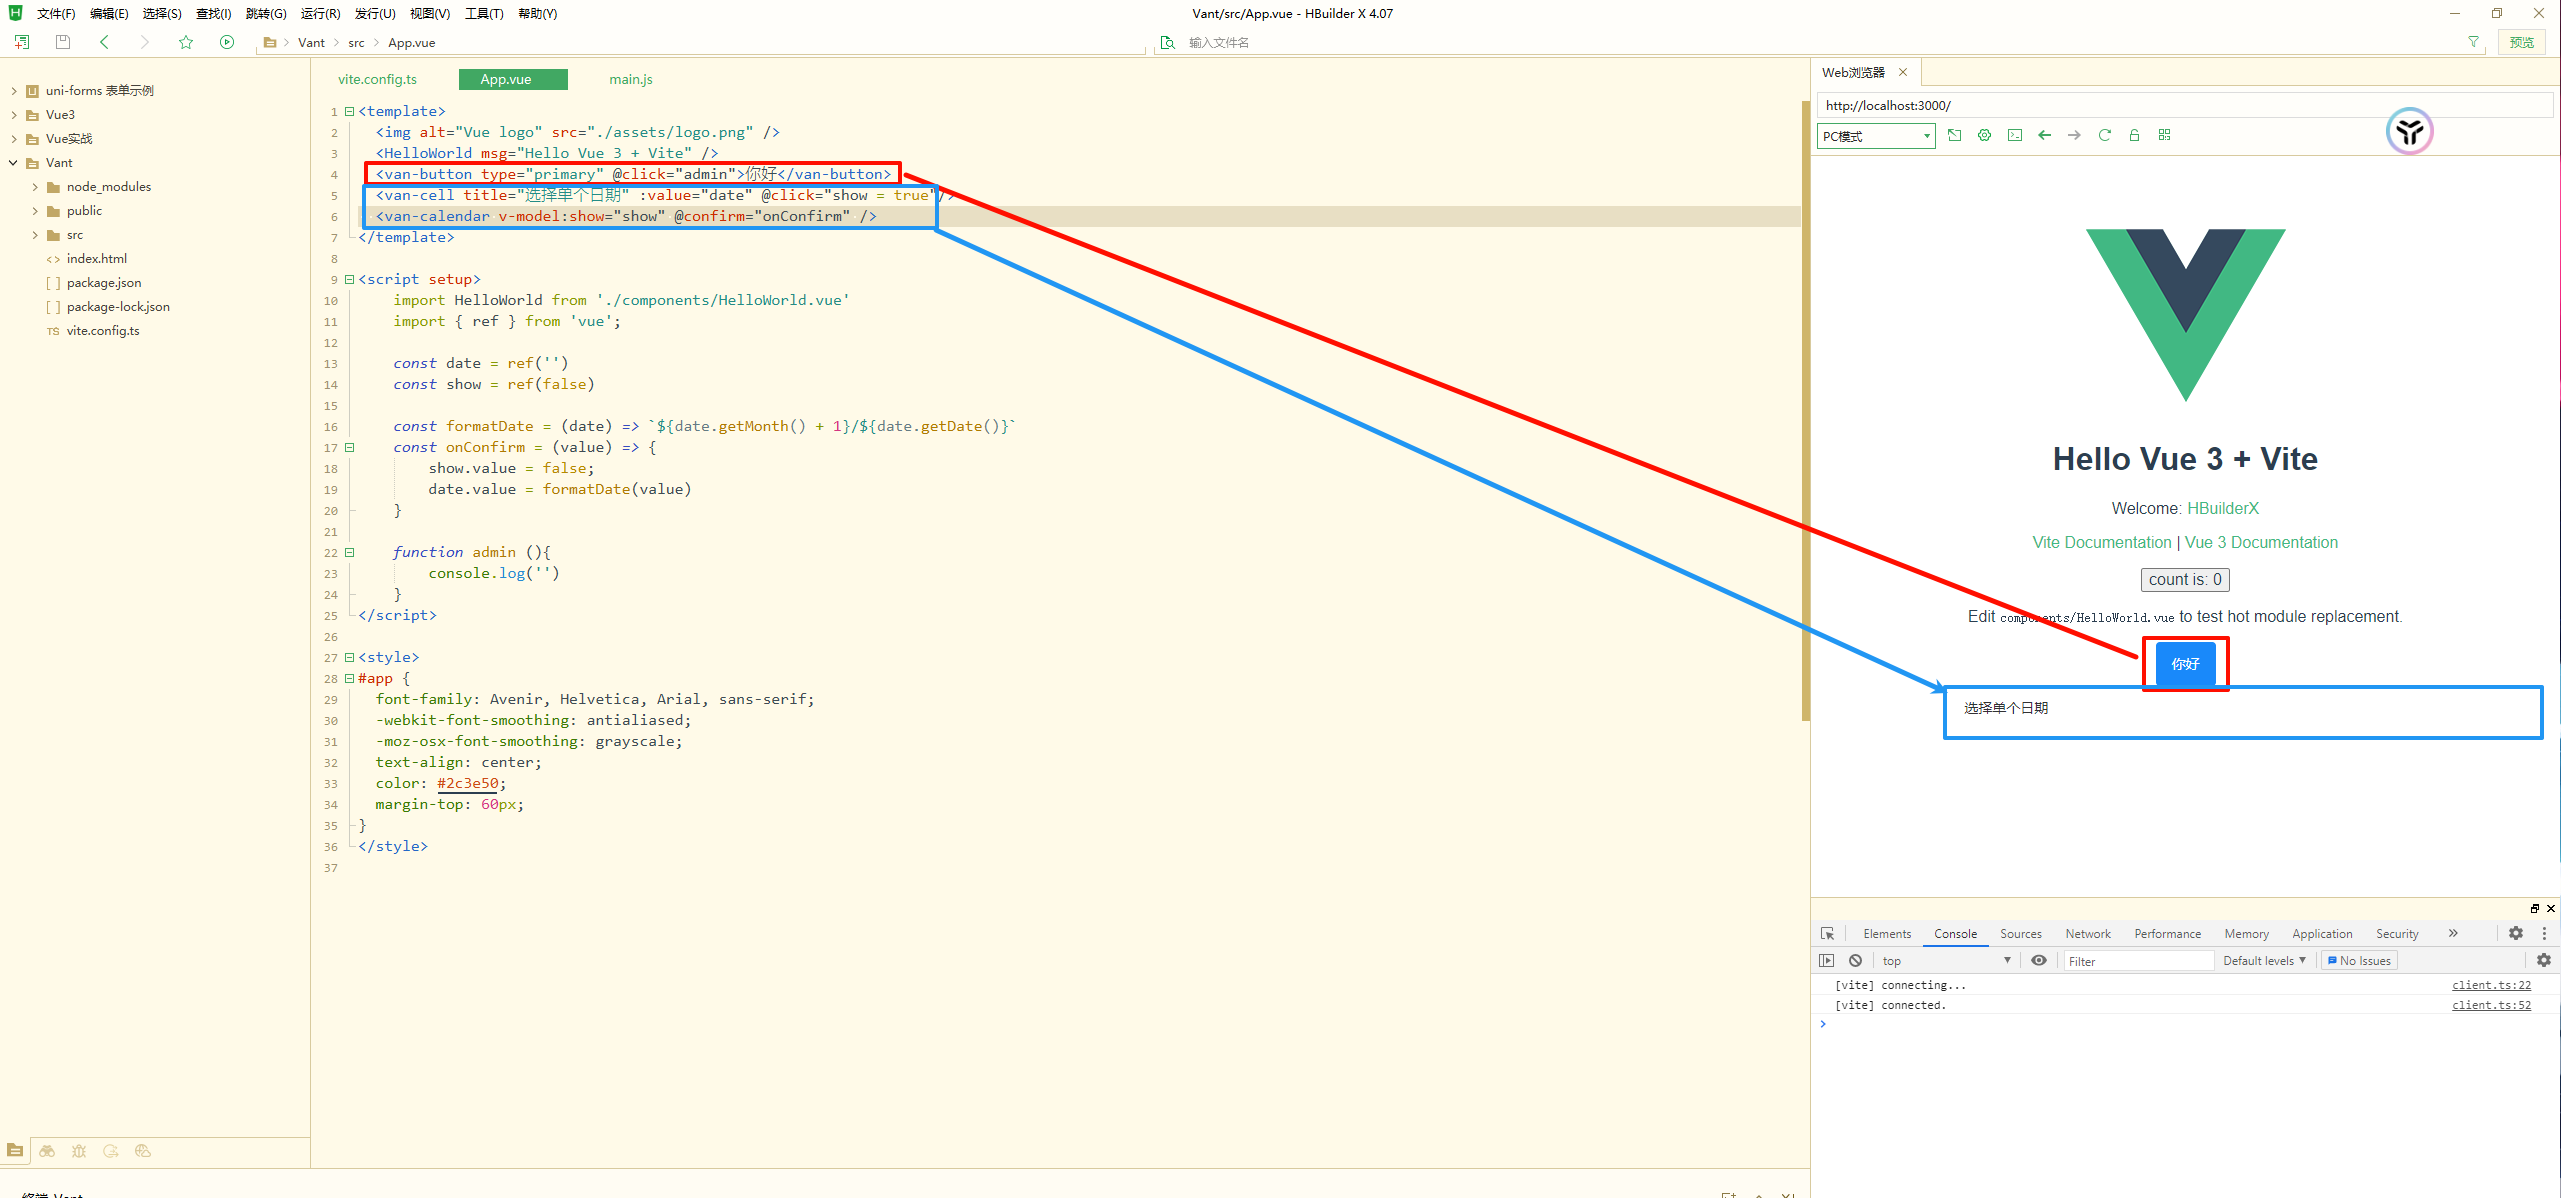
引入Vant组件库 之前在微信小程序中使用的 vant4 组件库也支持Vue版本,这边搞一下
先在Vue3项目中下载Vant
官方文档:https://vant-ui.github.io/vant/#/zh-CN/quickstart
全局引用 因为 我的Vue3是使用vite 来构建的,因此,会有一个vite.comfig.js文件
更改这个文件
1
2
3
4
5
6
7
8
9
10
11
12
13
14
15
16
17
18
19
20
21
22
import vue from '@vitejs/plugin-vue' import AutoImport from 'unplugin-auto-import/vite' import Components from 'unplugin-vue-components/vite' import { VantResolver } from '@vant/auto-import-resolver' export default { plugins : [ vue (), AutoImport ({ resolvers : [VantResolver ()], }), Components ({ resolvers : [VantResolver ()], }), ], };
如果报错的话,依次下载三个引入的地址
1
2
3
npm i unplugin-auto-import -D npm i unplugin-vue-components -D npm i @vant/auto-import-resolver -D
这个时候就可以直接在页面中使用vant组件了,不再需要任何的引用
按需引用 按需引用比较麻烦,需要再 main.js 的入口文件中引入
1
2
3
4
5
6
7
8
9
10
11
12
13
import { createApp } from 'vue' import App from './App.vue' import { Button } from 'vant' import 'vant/lib/index.css' ;const app = createApp (App )app.use (Button ) app.mount ('#app' )
剩下的就用就完了,没啥好说的。
引入three.js 官方文档:https://threejs.org/docs/index.html#manual/en/introduction/Creating-a-scene
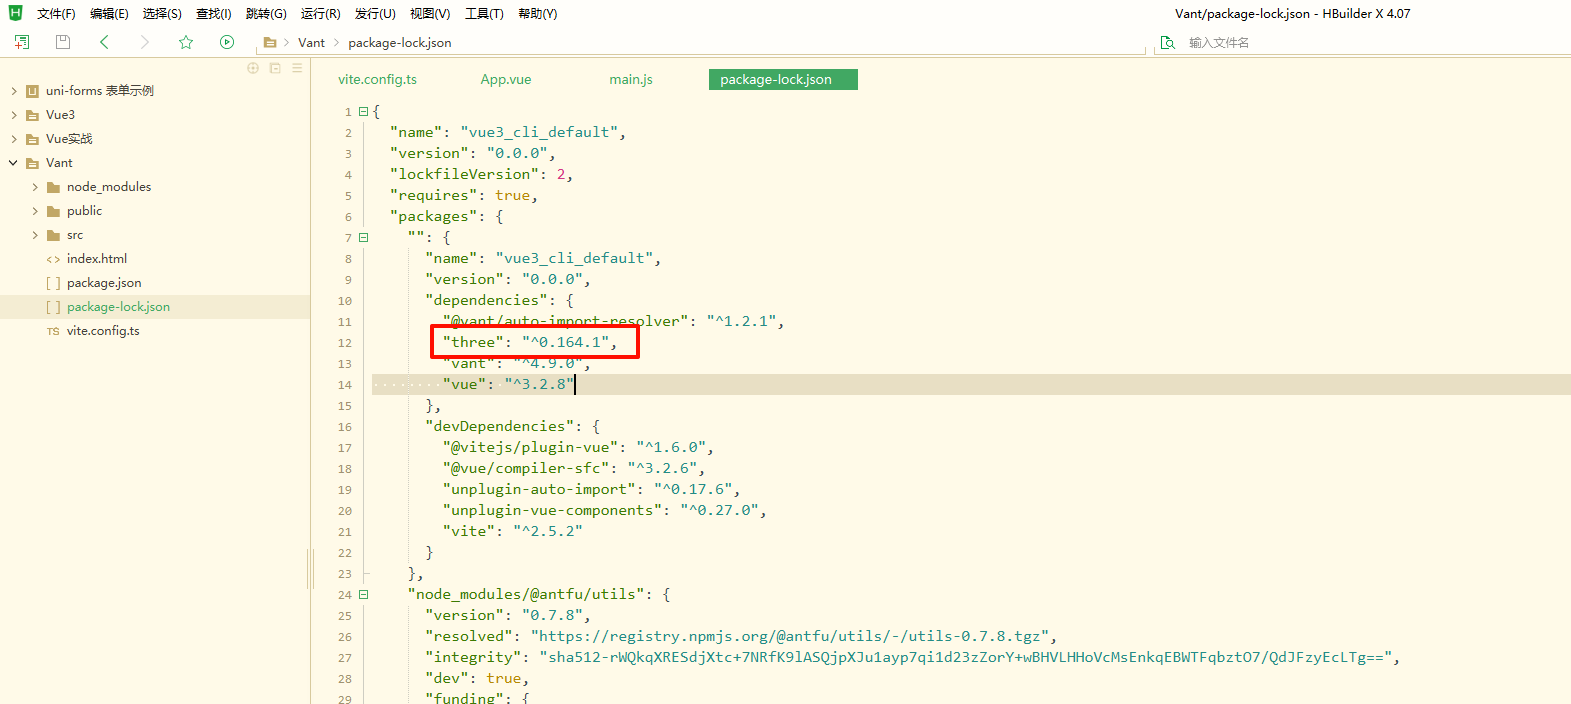
安装版本号
这个时候新建一个组件开始敲
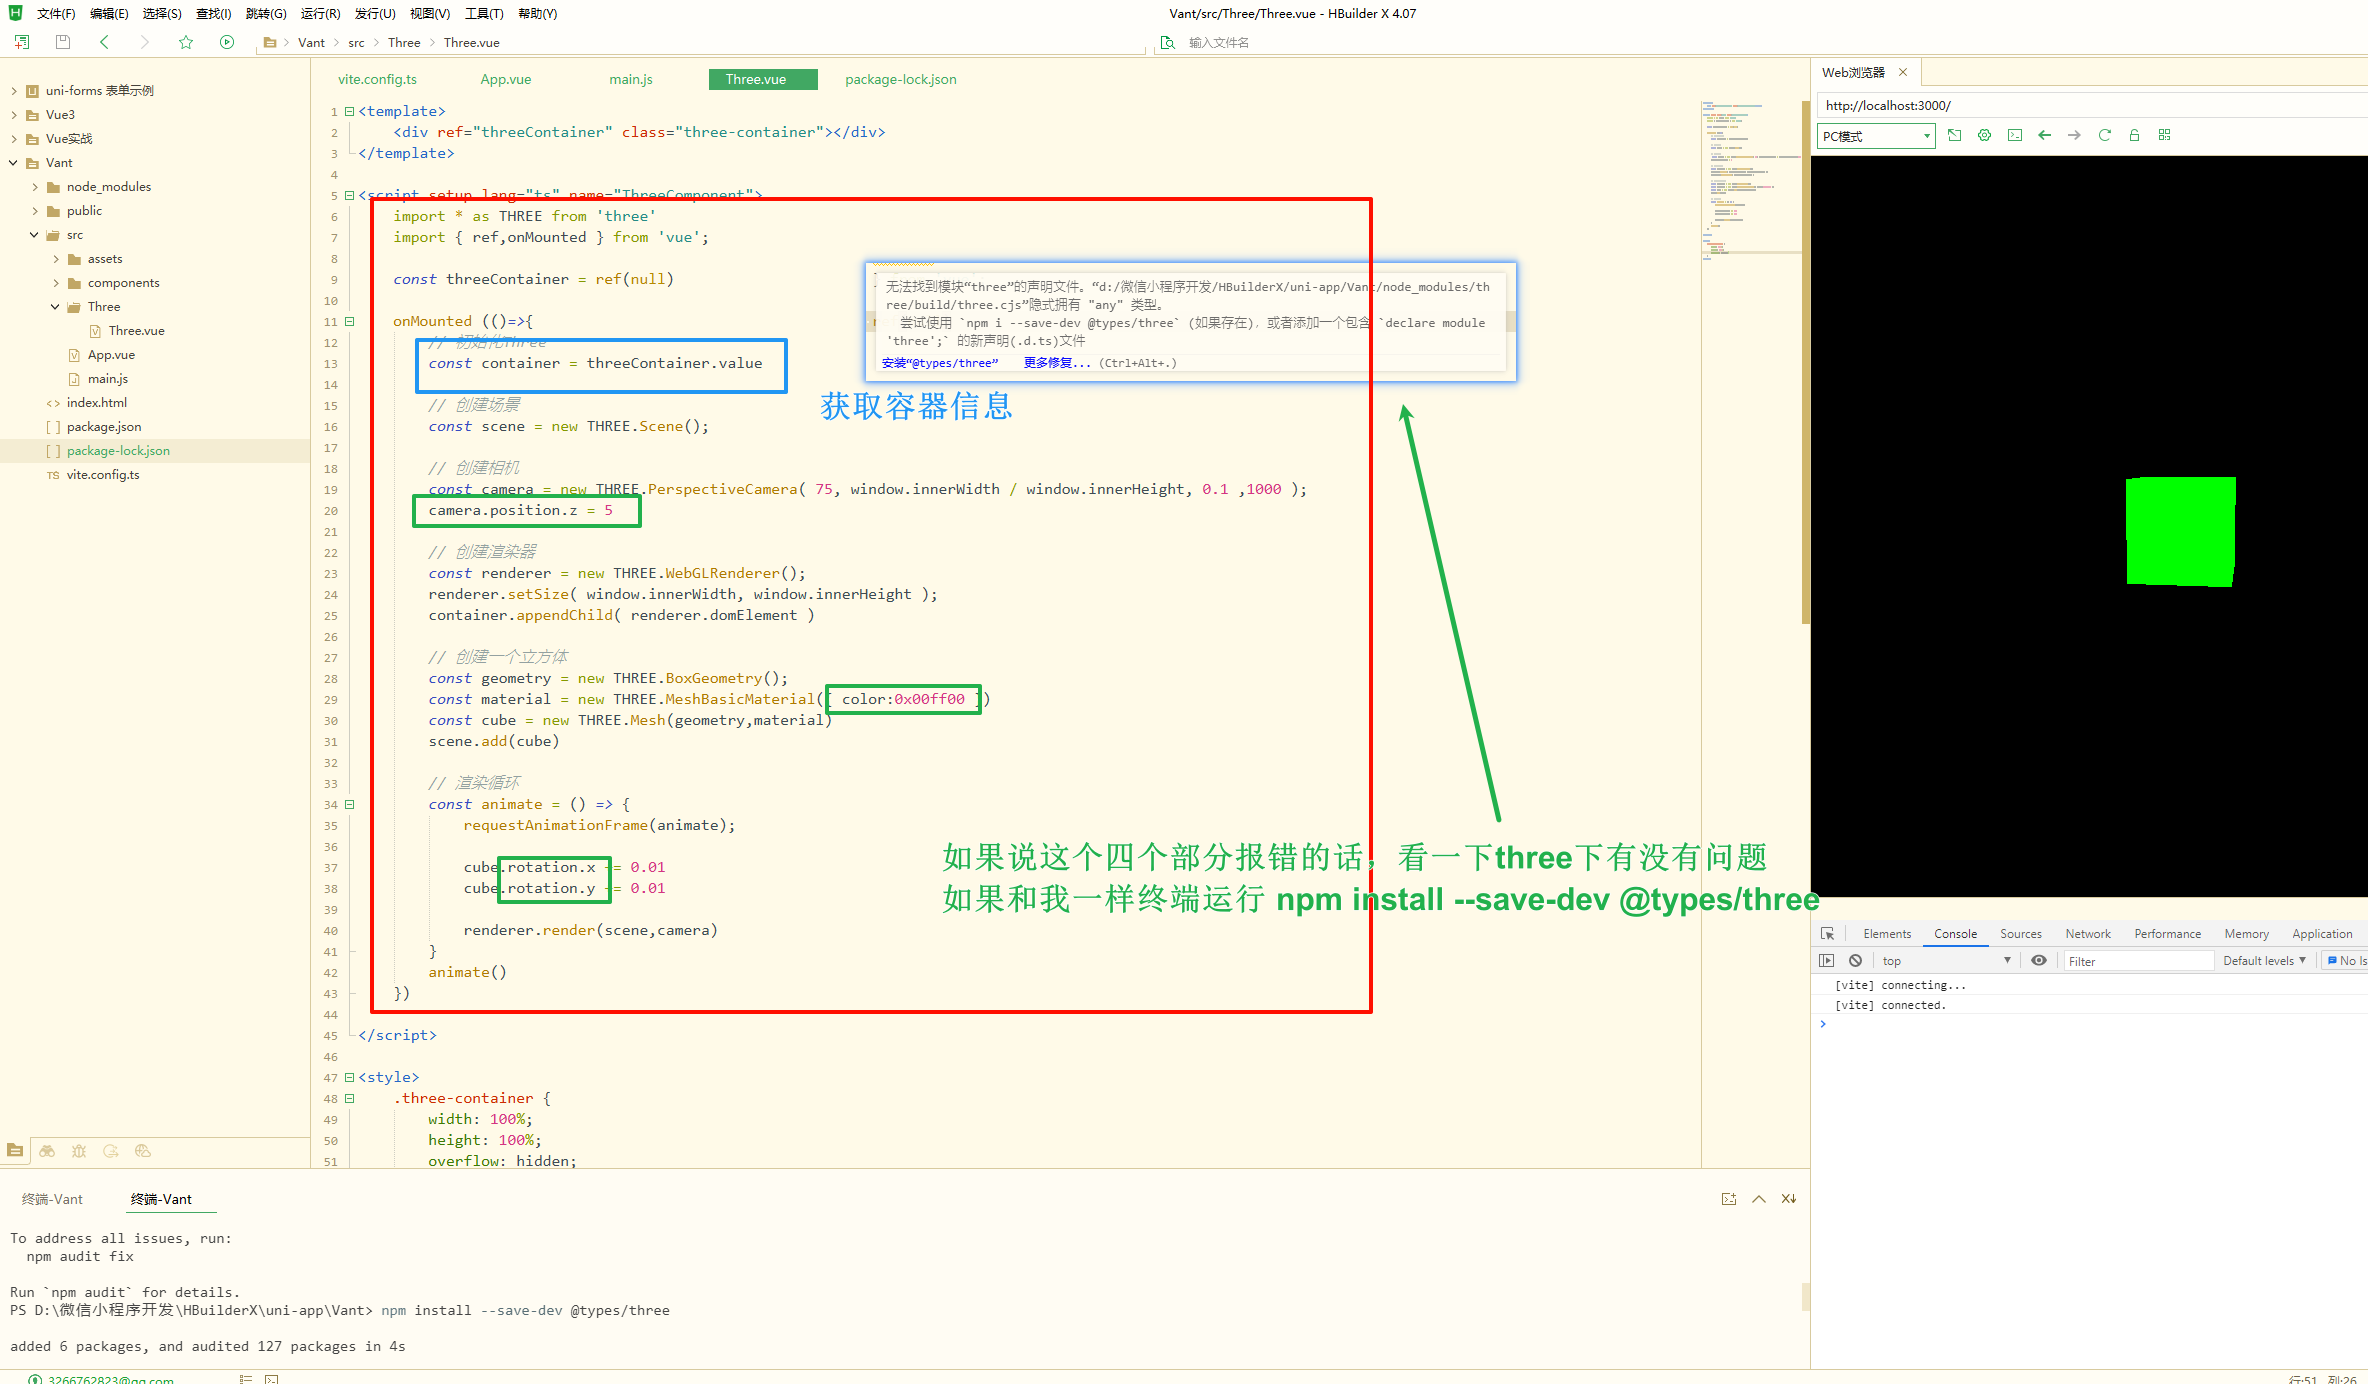
1
2
3
4
5
6
7
8
9
10
11
12
13
14
15
16
17
18
19
20
21
22
23
24
25
26
27
28
29
30
31
32
33
34
35
36
37
38
39
40
41
42
43
44
45
46
47
48
49
50
51
52
53
54
55
56
57
58
59
60
61
62
<template> <div ref="threeContainer" class="three-container"></div> </template> <script setup lang="ts" name="ThreeComponent"> import * as THREE from 'three' import { ref,onMounted } from 'vue'; const threeContainer = ref(null) onMounted (()=>{ // 初始化Three,获取容器信息 const container = threeContainer.value // 创建场景,创建一个新的 Three.js 场景 const scene = new THREE.Scene(); // 创建相机,创建一个透明相机,并设置其位置 const camera = new THREE.PerspectiveCamera( 75, window.innerWidth / window.innerHeight, 0.1 ,1000 ); // 这个postion.z 是设置相机高度 camera.position.z = 5 // 创建渲染器,将其大小设置为容器的宽度和高度,然后将渲染器的 DOM 元素添加到容器中 const renderer = new THREE.WebGLRenderer(); renderer.setSize( window.innerWidth, window.innerHeight ); container.appendChild( renderer.domElement ) // 创建一个立方体,并将其组合成一个网格对象,然后将该网络对象添加到场景中 const geometry = new THREE.BoxGeometry(); const material = new THREE.MeshBasicMaterial({ color:0x00ff00 }) // 设置立方体颜色,color const cube = new THREE.Mesh(geometry,material) scene.add(cube) // 将这个cude添加到 Three.js 中 // 渲染循环,创建一个动画循环,在每一帧中,旋转立方体,渲染场景 const animate = () => { requestAnimationFrame(animate); cube.rotation.x += 0.01 cube.rotation.y += 0.01 // x,y 分别为x,y方向旋转的速度 renderer.render(scene,camera) } animate() }) </script> <style> .three-container { width: 100%; height: 100%; overflow: hidden; } // 设置div样式,使其覆盖整个视口并隐藏溢出内容 </style>
1 npm install --save-dev @types/three
这样就写出来了一个自动旋转的绿色正方体
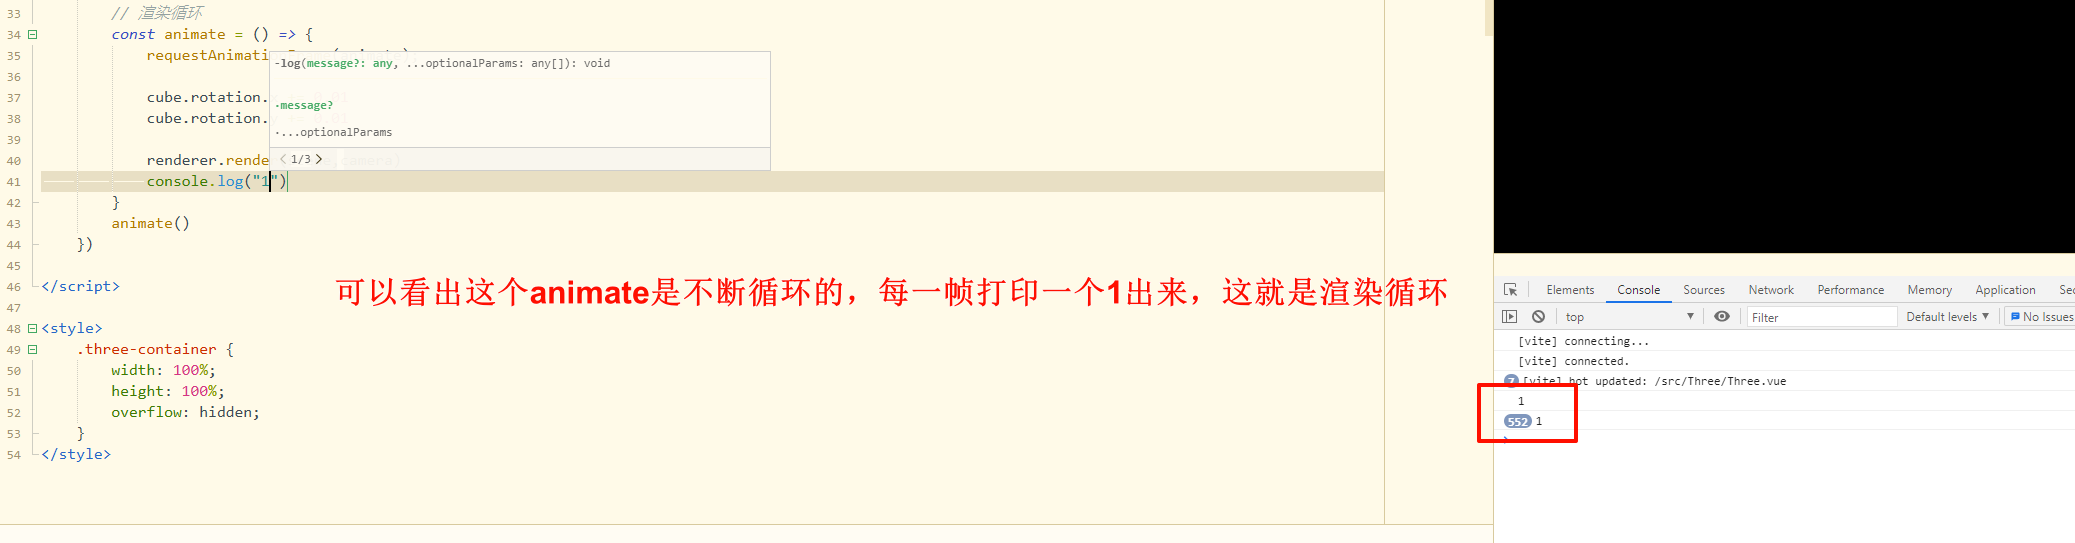
注意这里是有循环的,要使用卸载钩子将组件不引用时卸载掉three场景,释放资源
1
2
3
4
5
6
7
8
9
10
11
12
13
14
15
16
17
18
19
20
21
22
23
24
25
26
27
28
29
30
31
32
33
34
35
36
37
38
39
40
41
42
43
44
45
46
47
48
49
50
51
52
53
54
55
56
57
58
59
60
61
62
63
// 引入监听页面卸载的钩子,小改一下代码,懒得写注释了 <script setup lang="ts" name="ThreeComponent"> import * as THREE from 'three' import { ref,onMounted,onUnmounted } from 'vue'; const threeContainer = ref<HTMLDivElement | null>(null) const cube = new THREE.Mesh const renderer = new THREE.WebGLRenderer(); let animationId:number onMounted (()=>{ if (!threeContainer.value) return; // 初始化Three const container = threeContainer.value // 创建场景 const scene = new THREE.Scene(); // 创建相机 const camera = new THREE.PerspectiveCamera( 75, window.innerWidth / window.innerHeight, 0.1 ,1000 ); camera.position.z = 3 // 创建渲染器 renderer.setSize( window.innerWidth, window.innerHeight ); container.appendChild( renderer.domElement ) // 创建一个立方体 const geometry = new THREE.BoxGeometry(); const material = new THREE.MeshBasicMaterial({ color:0x00ff00 }) const cube = new THREE.Mesh(geometry,material) scene.add(cube) // 渲染循环 const animate = () => { animationId = requestAnimationFrame(animate); cube.rotation.x += 0.01 cube.rotation.y += 0.01 console.log('1') renderer.render(scene,camera) } animate() }), onUnmounted (()=>{ // 停止动画循环 cancelAnimationFrame(animationId) // 清除几何体材质 cube.geometry.dispose(); (cube.material as THREE.Material).dispose() // 移除渲染器的 DOM 元素 if (renderer && renderer.domElement && renderer.domElement.parentNode) { renderer.domElement.parentNode.removeChild(renderer.domElement); } // 清理渲染器 renderer.dispose(); }) </script>
这里写了一个打印1的地方,通过编程式导航来进行跳转发现,返回后,1停止打印,说明已经释放资源
防止父容器的点击态 想写一个俄罗斯方块,写到暂停键的时候,遇到了问题,先看一下能不能看出来
1
2
3
4
5
6
7
8
9
10
11
12
13
14
15
16
17
18
19
20
21
22
23
24
25
26
27
28
29
30
31
32
33
34
35
36
37
38
39
40
41
42
43
44
45
46
47
48
49
50
51
52
53
54
55
56
57
58
59
60
61
62
63
<template> <div class="box-right"> <div style="margin-top: 80px;">{{forTime}}</div> <div class="box-right-icon" @click="stop"> <div @click="stop" :class="status?'icon-content':'icon-stop'" ></div> </div> </div> </template> <script setup lang="ts"> import { ref,watch,onMounted,onUnmounted } from 'vue'; let num = 200 let hour = ref(0) let minute = ref(0) let second = ref(0) let timer:any let forTime = ref('') let status = ref(true) function updatatime() { if (status.value=true) { if (second.value == 59) { second.value = 0 minute.value += 1 } else { second.value += 1 } } else { return } } function stop() { console.log('stop triggered') status.value = !status.value if (status.value) { timer = setInterval(updatatime, 1000); // 继续计时 } else { clearInterval(timer) } } onMounted(()=>{ updatatime() timer = setInterval(updatatime,1000) }) onUnmounted(()=>{ clearInterval(timer) }) const time = watch(second,(value)=>{ if (minute.value<10 && second.value<10) { forTime.value = hour.value+':0'+minute.value+':0'+second.value } else if(second.value<10) { forTime.value = hour.value+':'+minute.value+':0'+second.value } else if(minute.value<10) { forTime.value = hour.value+':0'+minute.value+':'+second.value } else { forTime.value = hour.value+':'+minute.value+':'+second.value } }) </script>
我是通过打印事件,排查出来的,点击样式内的div后,会触发两次点击事件,true变为false又变为false,以此,导致了视觉上的子容器的点击事件不好使的情况
解决方法
1
2
3
4
5
6
7
8
9
10
11
function stop(event: Event) { event.stopPropagation() status.value = !status.value if (status.value) { timer = setInterval(updatatime, 1000); // 继续计时 } else { clearInterval(timer) } } // 给他来一个event.stopPropagation()阻止冒泡即可,之前从未遇到过这样需求,长知识了
获取非普通标签的DOM元素 写俄罗斯方块的时候,我将方块封装为不同的组件
封装组件
1
2
3
4
5
6
7
8
9
10
11
<template> <div class="lang" ref="rootElement"> <div v-for="x in 4" class="lang-bor"></div> </div> </template> <script setup lang="ts"> import { ref } from 'vue'; const rootElement =ref<HTMLElement | null>(null) </script>
想要获取组件的DOM元素,只需要给最外层一个ref即可
然后再调用组件的页面
1
2
3
4
5
6
7
8
9
10
11
12
13
14
15
16
17
<template> <long-vue ref="movableDiv"></long-vue> </template> <script setup lang="ts"> import { ref,watch,onMounted,onUnmounted,nextTick } from 'vue'; import longVue from '../components/long.vue'; onMounted(async ()=>{ await nextTick() if (movableDiv.value) { const movawidth = movableDiv.value.$el.offsetWidth const movaheight = movableDiv.value.$el.offsetHeight console.log(movawidth,movaheight) } }) </script>
比直接获取HTML标签的DOM元素中多了一个 $el 加上就可以直接拿到组件的DOM 元素
导出微信语音 首先将微信呢语音收藏,然后呢在手机版中,将语音转化为笔记
再在..\FileStorage\Fav\Temp\xxxxx\res中 找到一个拓展名为silk的文件
利用一个小工具silk2mp3,我是不敢在真机中使用,所以扔虚拟机了
直接解码为mp3即可导出微信语音
属性
值
描述
autoplay
autoplay
如果出现该属性,则音频在就绪后马上播放。
controls
controls
如果出现该属性,则向用户显示音频控件(比如播放/暂停按钮)。
loop
loop
如果出现该属性,则每当音频结束时重新开始播放。
muted
muted
如果出现该属性,则音频输出为静音。
preload
auto
规定当网页加载时,音频是否默认被加载以及如何被加载。
src
URL
规定音频文件的 URL。
audio属性
属性
描述
audioTracks
返回表示可用音频轨道的 AudioTrackList 对象
autoplay
设置或返回是否在加载完成后随即播放音频
buffered
返回表示音频已缓冲部分的 TimeRanges 对象
controller
返回表示音频当前媒体控制器的 MediaController 对象
controls
设置或返回音频是否显示控件(比如播放/暂停等)
crossOrigin
设置或返回音频的 CORS 设置
currentSrc
回当前音频的 URL
currentTime
设置或返回音频中的当前播放位置(以秒计)
defaultMuted
设置或返回音频默认是否静音
defaultPlaybackRate
设置或返回音频的默认播放速度
duration
返回当前音频的长度(以秒计)
ended
返回音频的播放是否已结束
error
返回表示音频错误状态的 MediaError 对象
loop
设置或返回音频是否应在结束时重新播放
mediaGroup
设置或返回音频所属的组合(用于连接多个音频元素)
muted
设置或返回音频是否静音
networkState
返回音频的当前网络状态
paused
设置或返回音频是否暂停
playbackRate
设置或返回音频播放的速度
played
返回表示音频已播放部分的 TimeRanges 对象
preload
设置或返回音频是否应该在页面加载后进行加载
readyState
返回音频当前的就绪状态
seekable
返回表示音频可寻址部分的 TimeRanges 对象
seeking
返回用户是否正在音频中进行查找
src
设置或返回音频元素的当前来源
textTracks
返回表示可用文本轨道的 TextTrackList 对象
volume
设置或返回音频的音量
audio方法
方法
描述
addTextTrack()
在音频中添加一个新的文本轨道
canPlayType()
检查浏览器是否可以播放指定的音频类型
fastSeek()
在音频播放器中指定播放时间。
getStartDate()
返回一个新的Date对象,表示当前时间轴偏移量
load()
重新加载音频元素
play()
开始播放音频
pause()
暂停当前播放的音频
封装图片验证码 1 2 3 4 5 6 7 8 9 10 11 12 13 14 15 16 17 18 19 20 21 22 23 24 25 26 27 28 29 30 31 32 33 34 35 36 37 38 39 40 41 42 43 44 45 46 47 48 49 50 51 52 53 54 55 56 57 58 59 60 61 62 63 64 65 66 67 68 69 70 71 72 73 74 75 76 77 78 79 80 81 82 83 84 85 86 87 88 89 90 91 92 93 94 95 96 97 98 99 100 101 102 103 104 105 106 107 108 109 110 111 112 113 114 115 116 117 118 119 <template> <div class="img-verify"> <canvas ref="verify" :width="state.width" :height="state.height" @click="handleDraw"></canvas> </div> </template> <script setup lang="ts"> import { ref,onMounted,reactive } from 'vue'; const verify = ref(null) const emit = defineEmits(["get-code"]) const state = reactive({ pool:"qwertyuiopasdfghjklzxcvbnm1234567890", width:120, height:40, imgCode:'', }) // 随机数字 const randomNum = (min,max) => { return parseInt(Math.random() * (max - min) + min) } // 随机颜色 const randomColor = (min,max) => { const r = randomNum(min,max) const g = randomNum(min,max) const b = randomNum(min,max) return `rgb(${r},${g},${b})` } // 绘制图片 const draw = () => { // 填充背景颜色 const ctx = verify.value.getContext("2d") // 填充颜色 ctx.fillStyle = randomColor(180,230) // 填充位置 ctx.fillRect(0,0,state.width,state.width) // 定义paramText let imgCode = ''; // 产生随机数字,并且随即旋转 for (let i = 0; i < 4; i++) { // 产生随机数字 const text = state.pool[randomNum(0,state.pool.length)] imgCode += text // 随机大小字体 const fontSize = randomNum(18,40); // 随机字体角度 const deg = randomNum(-30,30) ctx.font = fontSize + 'px Simhei'; ctx.textBaseline = "top"; ctx.fillStyle = randomColor(80,150) ctx.save() ctx.translate(30 * i + 15,15); ctx.rotate((deg * Math.PI) / 180) ctx.fillText(text, -15 + 5, -15) ctx.restore() } // 随机5条干扰线 for (var i = 0; i < 5; i++) { ctx.beginPath(); ctx.moveTo(randomNum(0,state.width),randomNum(0,state.height)) ctx.lineTo(randomNum(0,state.width),randomNum(0,state.height)) ctx.strokeStyle = randomColor(180,230); ctx.closePath() ctx.stroke() } // 产生40个干扰点 for (var i = 0; i < 40; i++) { ctx.beginPath(); ctx.acr( randomNum(0,state.width), randomNum(0,state.height), 1, 0, 2 * Math.PI ); ctx.closePath(); ctx.fillStyle = randomColor(150,200); ctx.fill(); } return imgCode } // 点击切换图片 const handleDraw = () => { state.imgCode = draw(); emit("get-code",state.imgCode) } // 初始化 onMounted(()=>{ state.imgCode = draw(); emit("get-code",state.imgCode) }) </script> <style> .img-verify { height: 40px; margin: 0 0.1rem; } .img-verify canvas { cursor: pointer; } </style>